
Tracking returned parts, cores, and vendor credits in HITS is simple—but only if you follow the correct workflow. To ensure consistency, accuracy, and proper credit tracking, all returns must be linked to a ticket or receipt and assigned the correct Return Goods status.
HITS uses two workflows for returns:
- From a Customer Work Order (OP items only)
- From the Return Goods Lookup (tracking, updating, and posting vendor credits)
- Manual returns for stocking SKUs
This document covers all three.
What Is a “Core”?
A core is a rebuildable or recyclable component that vendors charge a deposit on until the old part is returned. Examples include:
-
- Alternators
- Starters
- Brake calipers
- Power steering pumps
- Batteries – Returned for environmental recycling and credit
HITS tracks cores and other returns through the Return Goods process.
How to Return a Part or Core From a Work Order (OP Items Only)
⚠️ Important: The item must be a non-stocking part (OP – Outside Part). Stocking items cannot be returned using this method and will trigger an error message. See the section below on how to handle stocked item returns. Best Practices: Create ONE Return Goods Receipt for each individual item to be returned.
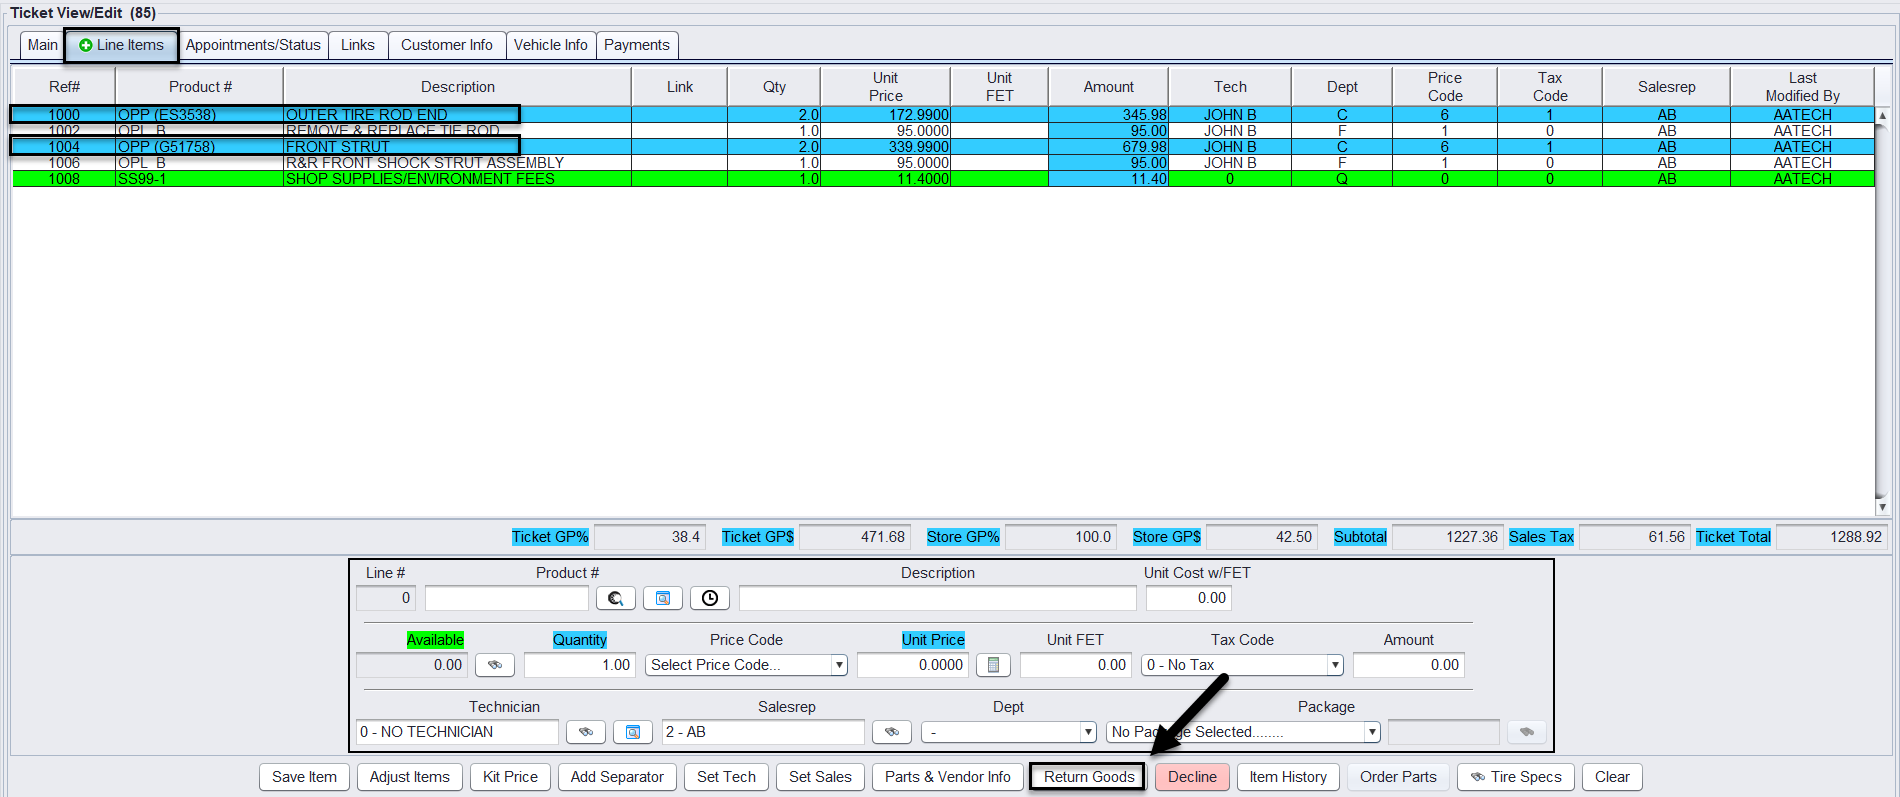
1.) Open the Customer Work Order – Navigate to the ticket that contains the part or core to be returned.
2.) Click the “Line Items” Tab – This tab displays all parts and services added to the work order.
3.) Ensure the Part is Marked as OP (Outside Part) – Look for OP in the Product # column or ensure the part was entered as a non-stocking item.
4.) Highlight the Part(s) to Return
5.) Click the “Return Goods” Button – Use the Return Goods button at the bottom of the screen or right-click and choose it from the context menu.
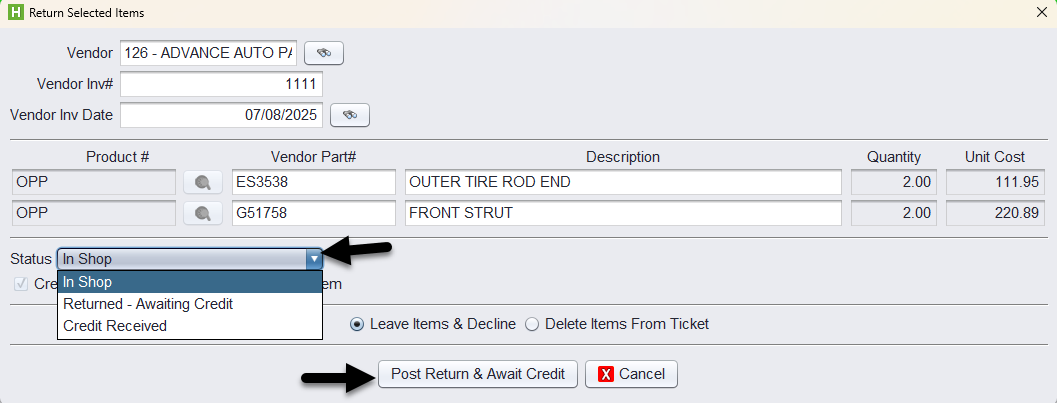
6.) Enter Return Details in the Pop-Up Window
-
- Vendor – Select the vendor the part was purchased from
- Vendor Invoice Number – Use the original invoice number
- Vendor Invoice Date – Use the date of that invoice
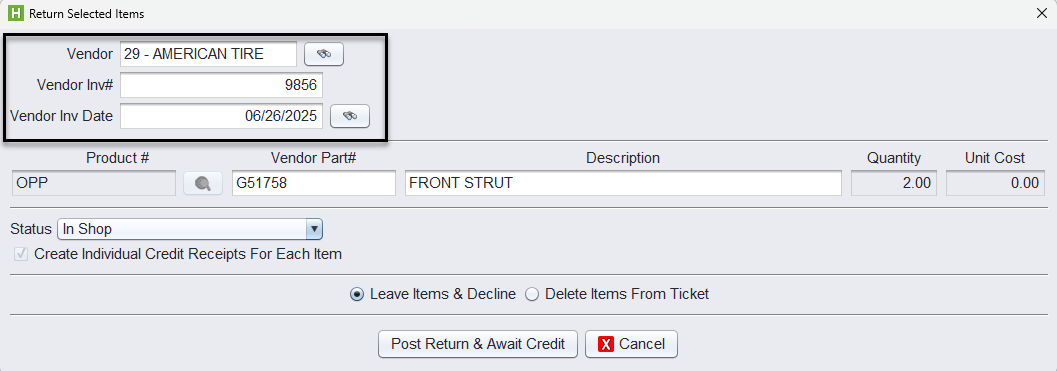
Note: Quantity and cost cannot be edited during this step. These must be corrected while the item is still active on the work order.
7.) Select the Return Status from the Dropdown
From the Status field, choose the appropriate stage of the return process:
-
- In Shop – The item is still at your location
- Returned – Awaiting Credit – The item has been shipped to the vendor, but credit has not been received
- Credit Received – The vendor has issued and processed the credit
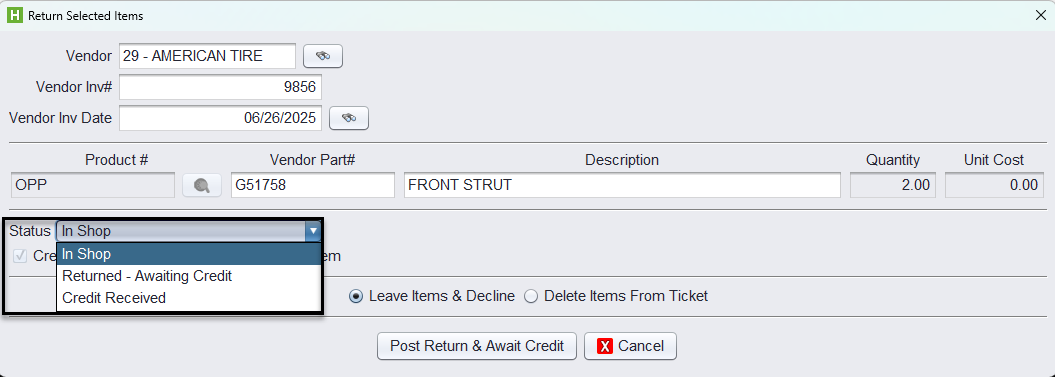
Note: Accurate status selection is important for tracking and reporting returns over time.
8.) Choose What Happens to the Item on the Ticket
-
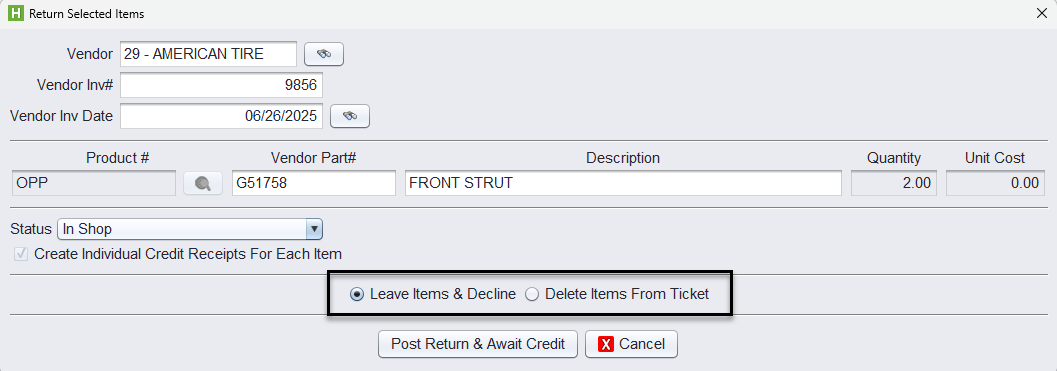
- Leave as Declined – Keeps item visible
- Delete from Ticket – Removes it entirely
(Either option will still process the return and post a credit receipt.)
9.) Click “Post Return and Await Credit”
After you post the return, the type of receipt(s) created will depend on the status selected
| Status | Receipts Created |
|---|---|
| In Shop | One Return Receipt only — no credit is recorded yet |
| Returned – Awaiting Credit | One Return Receipt One or more Credit Receipts (open) |
| Credit Received | One or more Credit Receipts (marked as received) — no return receipt |
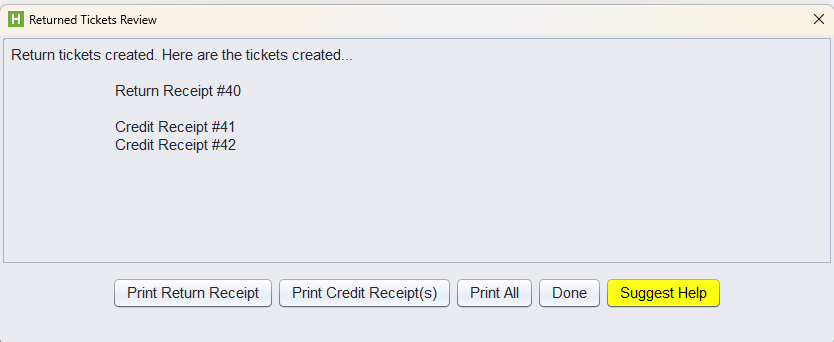
Once the return is posted, you’ll see a Returned Tickets Review window like this:
You’ll have several options:
-
- Print Return Receipt – Confirms the items were posted as returned
- Print Credit Receipt(s) – Displays the pending or posted vendor credits
- Print All – Prints all receipts generated
- Done – Closes the window and returns you to the main screen
Tracking Returns & Posting Credits Using the Return Goods Lookup
After returns have been posted from a work order or created manually, all return activity is managed from the Return Goods Lookup screen. This screen allows you to view every part or core currently pending credit and take action on each item. The Return Goods Lookup also shows any open credit receipts created when an item was returned as “Returned – Awaiting Credit,” and these stay open until the vendor issues the actual credit memo.
To access the lookup screen, click the R/C Lookup (Returned Credits Lookup) button on the toolbar, then choose the Return Goods Tickets tab:
The Return Goods Lookup screen lets you:
-
- Filter by vendor
- Filter by return status
- Filter by open or closed tickets
- Search by date range
- Search by store number
- Review original invoices, linked receipts, and credit details
Each returned item will show its current status:
-
- In Shop – Still at your location
- Returned – Awaiting Credit – Picked up by the vendor, waiting for credit
- Credit Received – Credit has been issued by the vendor
Updating the Return Status
If parts have been picked up by the vendor but credit has not yet been issued, you’ll need to update their status. Update the return status only when the vendor has physically picked up the part. Do not apply credits until the vendor has issued the actual credit memo.
1.) Highlight the returned part(s)
2.) Right-click on the selected items
3.) Choose Set Return Status
4.) Select the correct status:
-
- In Shop
- Returned – Awaiting Credit
- Credit Received
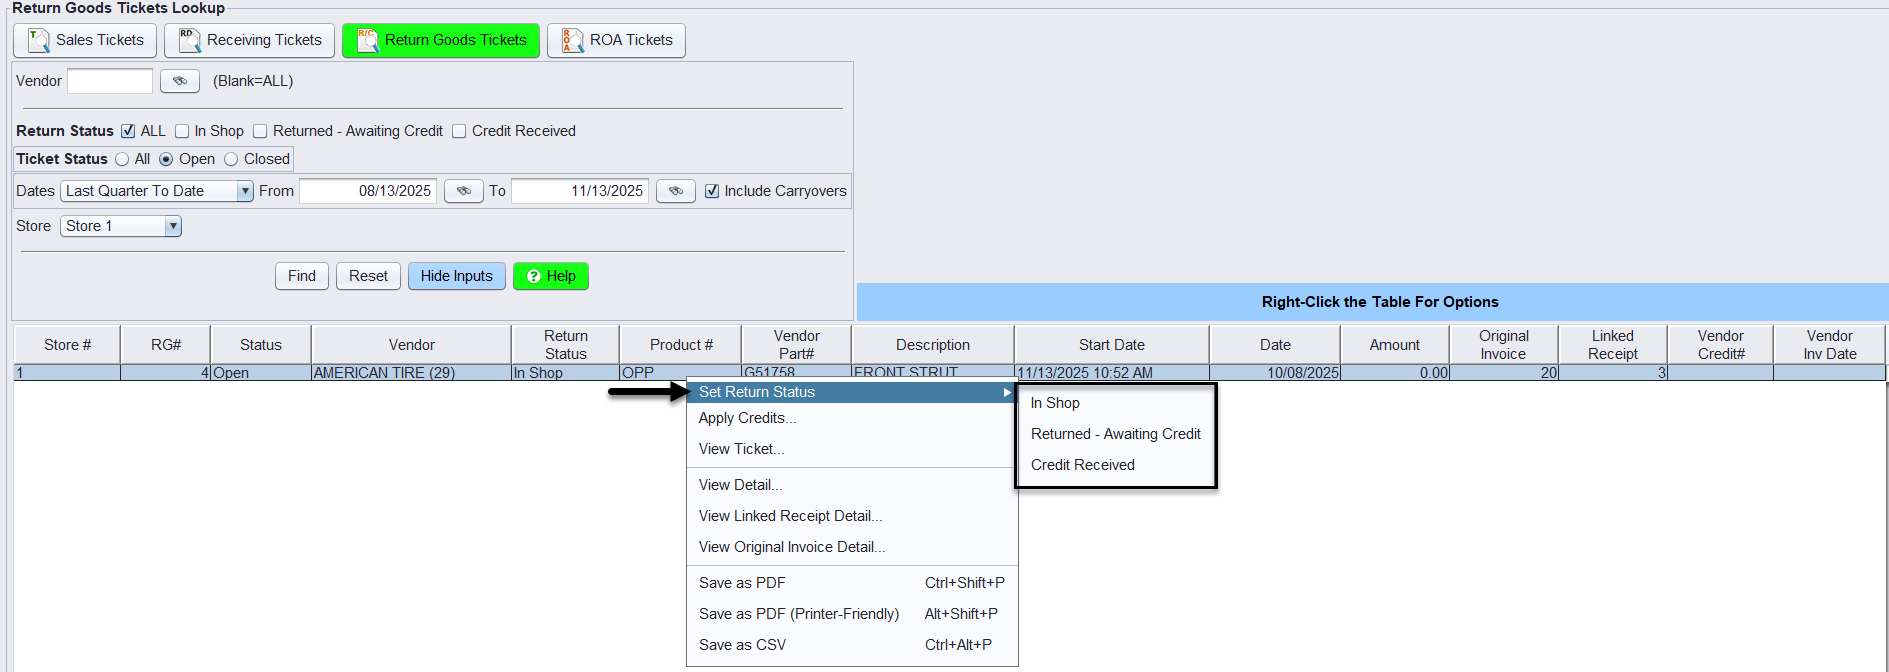
This updates the tracking information for each return and ensures accurate reporting.
Example: AutoZone has picked up these first four parts… We will need to update the status of these parts from In Shop to Returned – Awaiting Credit.
Posting Vendor Credits
When a vendor issues credit for your returned items:
1.) Highlight the items in the grid
2.) Right-click
3.) Click Apply Credits…Selecting Apply Credits simply opens the credit entry window. Nothing is posted or closed until you click Post Credits & Close.
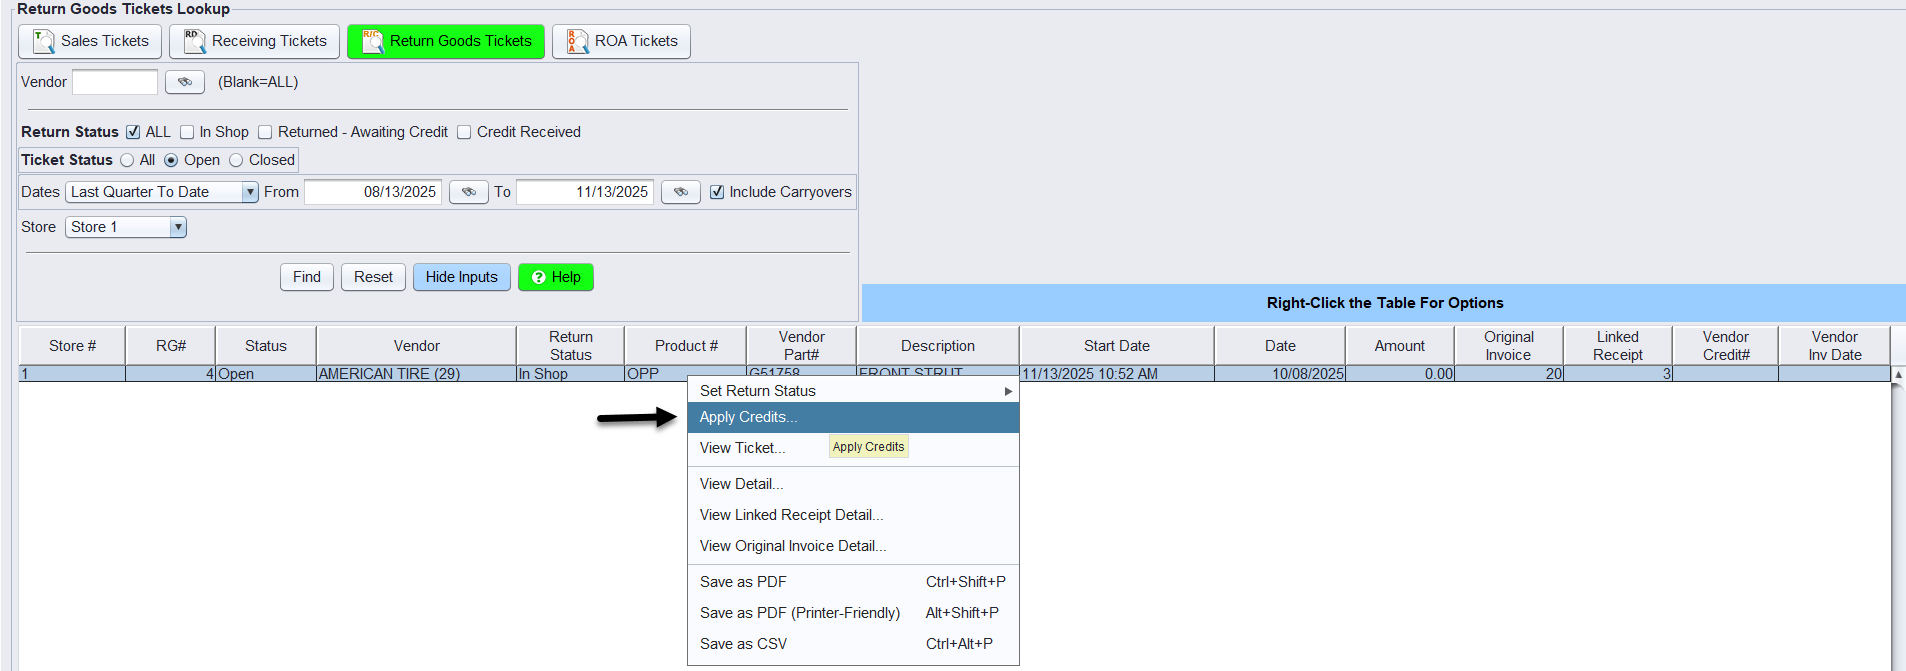
This opens the credit posting window, where you will:
- Confirm or adjust the expected vs. actual credit amount
- Enter the Vendor Credit Ticket Number
- Enter the Vendor Credit Date
Tip: Enter the ticket number and date in the first line, then press TAB to copy it to all selected lines. If the vendor has not yet issued credit, use Enter Credits & Leave Open to keep the credit receipt pending.
Once all information is correct:
4.) Click Post Credits and Close

HITS will:
- Post the vendor credit(s)
- Close the related credit receipts
- Remove those items from the open Return Goods list
Returned items will no longer appear in the grid once they are fully credited, unless the filter is set to show Closed tickets. Credited items will only disappear from the lookup screen when the receipt is closed, unless you change the Ticket Status filter to show Closed tickets.
How to Return a Stocking SKU (Manual Process)
Because stocking SKUs cannot be returned from a closed receipt or work order, you must post the return manually from the Receiving screen.
1.) Go to Views > Receiving
2.) Click Returns & Credits > create Return/Credit

3.) Go to the Main tab Change the “Return Status”
Use the dropdown to reflect the stage of the return process:
-
- In Shop – Item is still in your possession
- Returned – Awaiting Credit – Item has been sent to the vendor, credit is pending
- Credit Received – Vendor credit has been issued and processed
- Not a Return – Default status if this is not a return ticket

4.) Enter the stocking SKU ensuring a negative quantity. This properly reduces inventory levels and tracks the item as a return.
5.) Close the receipt
User Permissions Required for Manual Stocking Returns (P69)
When returning stocking SKUs manually through Views > Receiving, your user ID must have the appropriate P69 permission level to complete the receipt:
| P69 Setting | What It Allows |
|---|---|
1 |
Close a receipt marked as Returned Goods |
2 |
Create a single returned goods receipt for all/multiple items |
3 |
Full access – both options above |