
Need to send one customer’s invoices to a different account for payment? BPOS makes this easy with the Alternate Billing Number feature. It’s commonly used when a parent company, corporate office, or government agency pays the bills for several local accounts — a school district covering multiple branch locations, for example, or a corporate fleet account paying for several individual vehicles.
You have two ways to redirect a balance: set it up once on the customer’s account so it happens automatically every time, or redirect it manually on a single ticket as you close it out.
Setting Up an Automatic Redirect on a Customer Account
This method redirects every future invoice for that customer to the paying account, without any extra steps at checkout.
Step 1: Find the paying account’s number
From the Views menu, go to Sales Counter. Click the Customers icon and look up the account that will be responsible for paying the bill. Note its account number — you’ll need this as the “Billing #.”
Step 2: Open the customer you want to redirect
Go to Customers > Account – View/Edit. Click the binoculars icon next to Customer #, search for the account whose charges you want redirected, and double-click it to make it the active customer.
Step 3: Enter the Billing Number
On the Account Info tab, enter the paying account’s account number in the Billing # field. This tells BPOS where to send all future A/R charges for this customer.
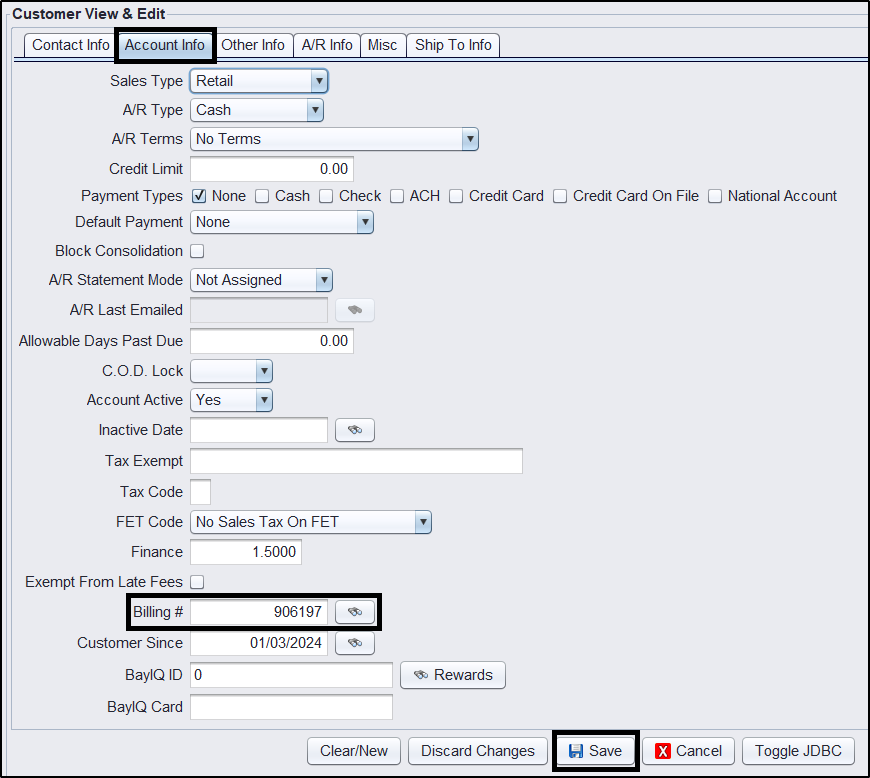
Step 4: Save
Click Save at the bottom of the screen. From this point forward, every invoice for this customer will automatically post to the account listed in the Billing # field.
Redirecting a Single Invoice Manually
Prefer to handle it case-by-case instead? You can redirect the balance right from the ticket when you’re ready to close it out.
Step 1: Open the Payments tab
From the Ticket View/Edit screen, click the Payments tab, then the A/R Distribution tab.
Step 2: Choose the account to bill
Click the binoculars next to the Account field to search for the paying account, or type in the account number directly and press Enter.
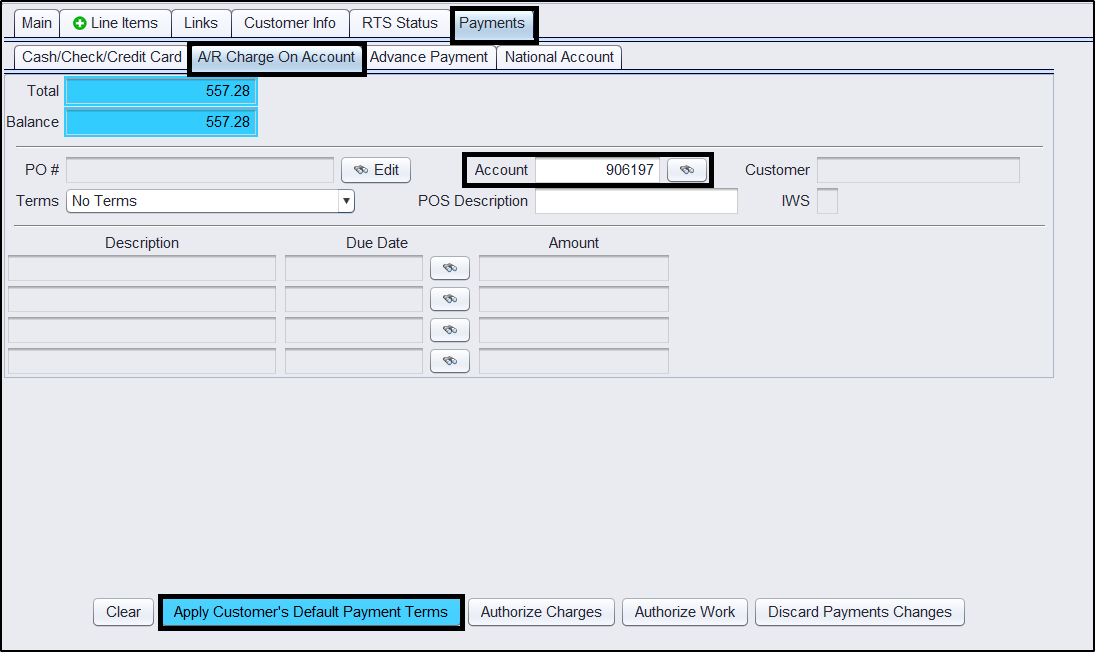
Step 3: Apply default terms
Click Apply Customer’s Default A/R Terms to pull in the correct terms for that account.
Step 4: Close the ticket
Print and close the ticket as you normally would — the charge will now post to the redirected account.
A Few Things to Keep in Mind
- There’s no limit to how many customer accounts can share the same Billing #.
- Only the parent or corporate account needs to be set up as the A/R charge account — the individual accounts just need the Billing # filled in.
- Editing a customer file requires password permissions P25 and P26.
- Manually redirecting a charge at ticket close requires password permission P7.
- If you need one of these permissions enabled, reach out to your system administrator.
Need help? HITS Technical Support is available Monday–Friday, 8:30am–4:30pm EST at (800) 422-2032 or tech@aasys.com. For after-hours emergencies, use the 24/7 number provided with your software.