
HITS has the ability to perform a physical count using a spreadsheet, which allows you to import adjustments. When you choose to Import the count sheet, the system will do the math calculations for you rather than manually adjusting an inventory item. This doc will show the steps for performing a physical count using a spreadsheet download and upload.
Download Count Sheets
1. Views > Reports > Inventory > Count Sheets
2. Make appropriate selections.
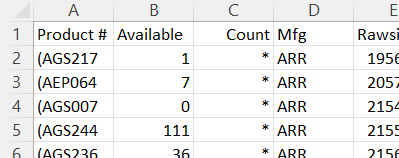
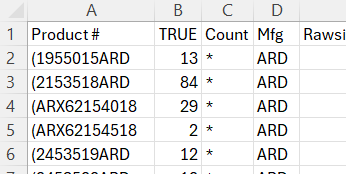
The count sheet allows you to choose which Quantity Basis to count from and which Quantity Basis exports:
![]()
To read about the difference between Available Qty and True Qty in HITS: click here.
The count sheet allows you set how the report sorts:
![]()
You may want to include items with positive quantity only, or you may want to include negative, and zero quantity as well if you want your entire inventory file to export. Additonally, you may want include the In Process quantities (WIP/RIP/TIP/OIP) for additional data as you perform count.
![]()
3. To export to spreadsheet (CSV), select the Export As CSV.
![]()
Counting
The spreadsheet defaults to counting from Available Qty, unless you changed the “Quality Basis” to True Qty.
Available:
True:
Regardless of which quantity basis you are using for your count, it is required for the Count column to be the 3rd column. This allows you enter the actual physical count. If the system count is correct, you can leave the * . It is only required to type in the Count qty if an adjustment is required for that product.
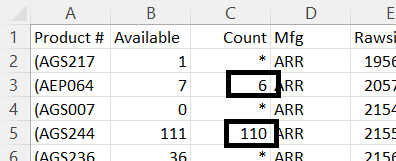
After completing the physical count and making notations on your spreadsheet, delete all columns except for the first three. To import this count and create an adjustment, you will need a three column spreadsheet: Product#, Expected, Count. Make sure to save this spreadsheet as a CSV.
Importing The Adjustment
1. To import the adjustment, click the Create button and Adjustment ticket type. (If the “Create” option is not your toolbar you can go to Views > Sales Counter > Tickets > Create Ticket).
2. From the Adjustment ticket, click the Import CSV button to import the spreadsheet you just created.

3. Select the Inventory Count option and Import the spreadsheet.
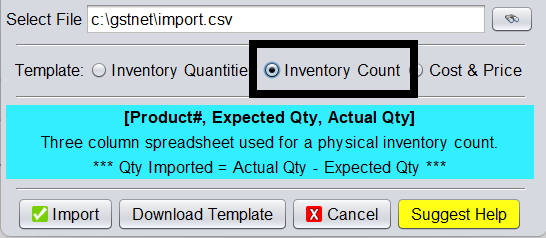
This will create an adjustment by subtracting the 3rd column from the 2nd column. Rows with a * will be skipped.
4. After reviewing the Adjustment ticket, you can Close the ticket.