
HITS has the ability to perform a physical count with a printed count sheet or spreadsheet. This doc will show the steps for performing a physical count using a printed count sheet and creating a manual adjustment receipt in which the user will need to manually calculate the difference to either add or subtract the available inventory.
Download Count Sheet
1. Views > Reports > Inventory > Count Sheets
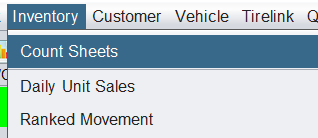
2. Make appropriate selections.
The count sheet allows you to choose which Quantity Basis to count from and which Quantity Basis exports:
![]()
To read about the difference between Available Qty and True Qty in HITS: click here.
The count sheet allows you set how the report sorts:
![]()
You may want to include items with positive quantity only, or you may want to include negative, and zero quantity as well if you want your entire inventory file to export. Additionally, you may want include the In Process quantities (WIP/RIP/TIP/OIP) for additional data as you perform count.
![]()
3. Click Run Report to print the count sheet.
Counting
The report will contain both the Available Qty, and the True Qty. Available Qty is based on all tickets (open and closed), and True Qty is based only on closed tickets. Some businesses perform their count off of Available Qty, others perform their count off of True Qty. To read about the difference between Available Qty and True Qty in HITS: click here.

The Count column will let you write-in the actual count of any items that have a variance from the system.
Creating a Manual Adjustment Ticket
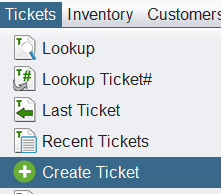
1. To manually create the inventory adjustment receipt, click the Create button and Adjustment ticket type. (If the “Create” option is not your toolbar you can go to Views > Sales Counter > Tickets > Create Ticket).
(Your system will need to have a HITS vendor flagged as an Inventory Adjustment vendor in order to use the Adjustment ticket function).
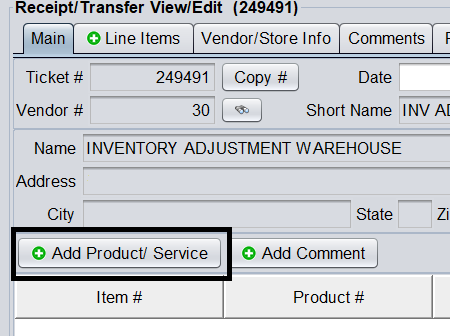
2. From the Adjustment ticket, click Add Product/ Service
3. Enter in the Product# of the product that is needing to be adjusted and the Adjust Qty (+/-).
Very important – When entering the Adjust Qty, this needs to be amount to adjust, not the amount that was counted! Example: If the count sheet showed there were 12 in stock, and you counted 8, enter -4 in the Adjust Qty to adjust the inventory minus 4.

3. Click Save to add this adjustment to the ticket. Continue to enter all products and adjustments that you counted variances for.
4. After reviewing the Adjustment ticket, you can Close the Adjustment ticket or leave open for a Manager to review and close.