The Payments tab in HITS allows users to apply and record payments for a work order using multiple methods. These include:
-
- Cash
- Check
- Credit Card (integrated or non-integrated)
- A/R Charge On Account (for Open Items customers)
- Advance Payments
- National Account Billing
Each method is accessed using the sub-tabs across the top of the Payments screen.
Cash Payment
1.) Go to the Payments tab and select Cash/Check/Credit Card.
2.) The Total and Balance Due display in blue at the top.
3.) Enter the cash amount in the green Cash & Checks Tendered section.
4.) Press Enter/Tab.
5.) The system:
-
-
-
- Defaults to “Cash”
- Displays Change in green
-
-
6.) As long as the Balance Due = 0, click Close to finalize the invoice.
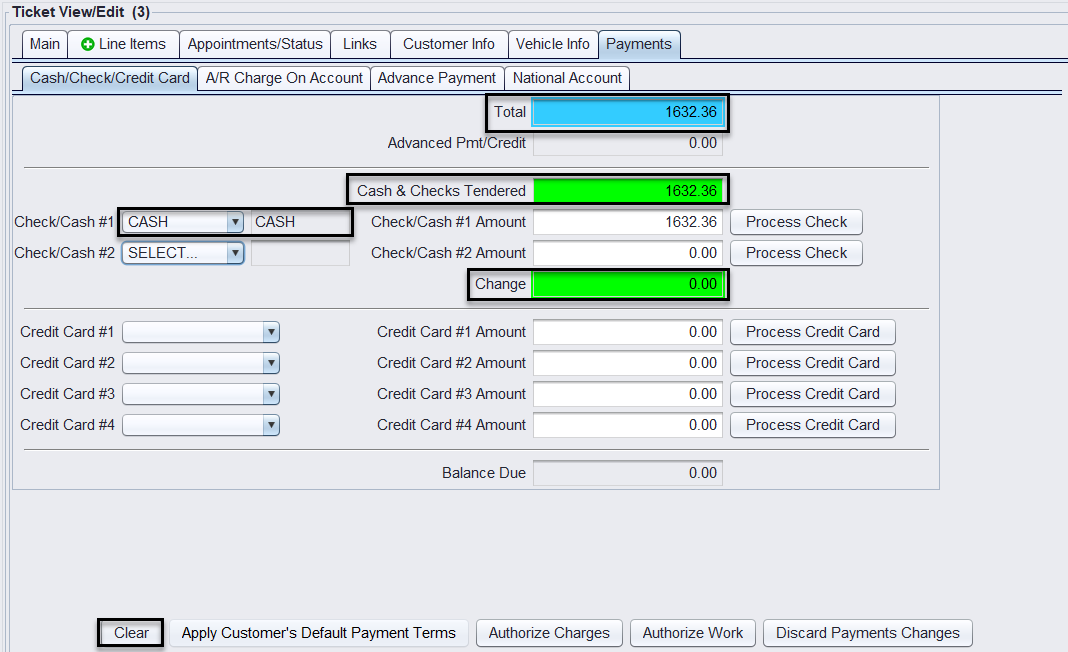
You can click Clear to remove any entries and reset the form before selecting Save or Close on the ticket.
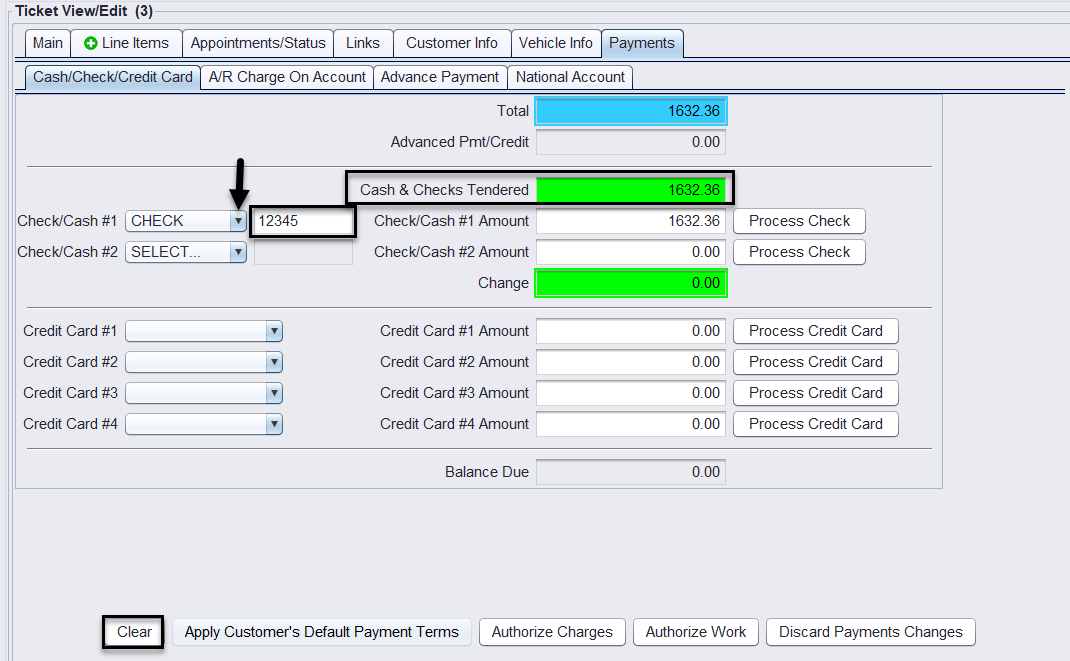
Check Payment
1.) In the Payments tab, stay in Cash/Check/Credit Card.
2.) Enter the amount of the check, then press Enter/Tab.
3.) By default, it records as Cash. Change the payment type:
-
-
-
- Select Check from the dropdown.
- Enter the Check Number in the appropriate field.
-
-
4.) When the Balance Due = 0, click Close.
Integrated Credit Card Payment (Merchant Partner – First Mile)
If your shop is integrated with First Mile:
1.) Go to Payments > Cash/Check/Credit Card.
2.) Review the Balance Due at the top of the screen.
3.) Click Process Credit Card to begin the transaction.
4.) Swipe the customer’s card (or have them swipe if using a customer-facing terminal).
5.) Once recognized, click Process to finalize the payment.
6.) Swipe the customer’s card (or have them swipe if using a customer-facing terminal).
7.) Once recognized, click Process to finalize.
8.) If Signature Capture is enabled, prompt the customer to sign the terminal.
9.) Click Show Credit Card Authorization to confirm the transaction. Note: the card type (MC/VI/etc.) is populated based on the card swiped.
10.) Once the Balance Due = 0, click Print and Close.
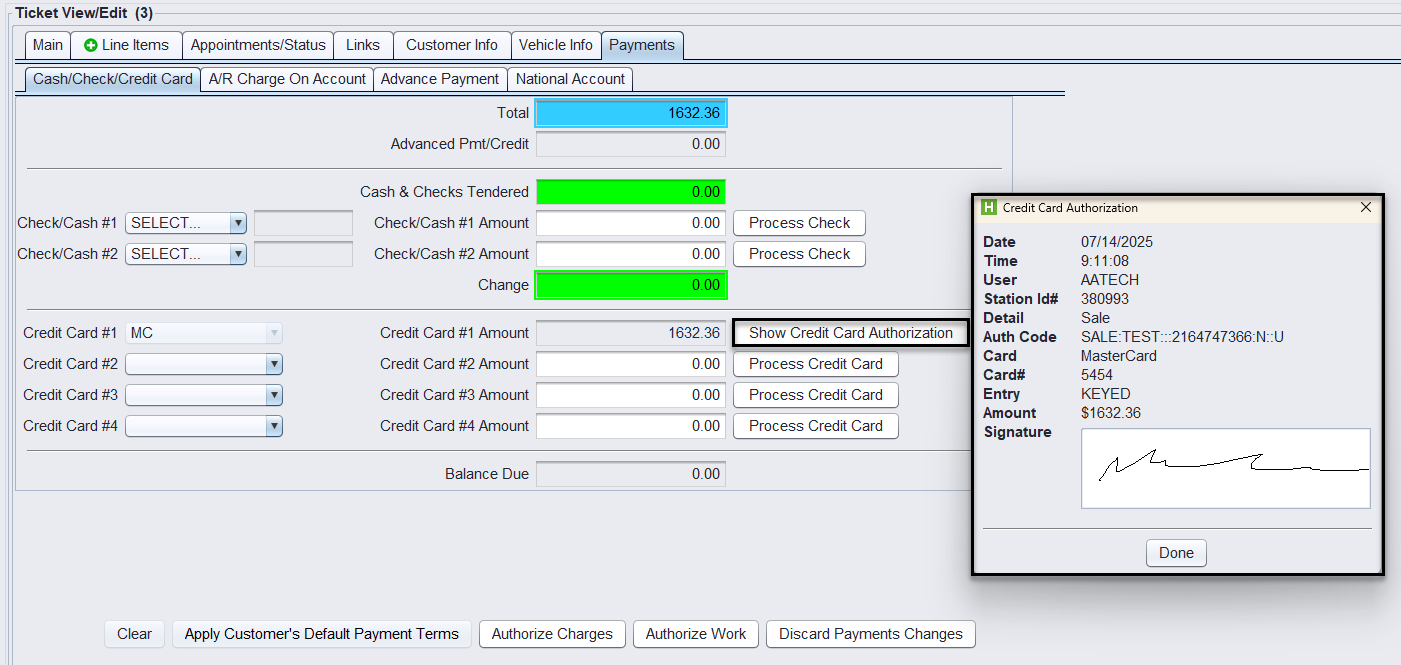
The customer’s signature will print on their final invoice if signature capture is enabled in Store System View/Edit settings under Switches>X27.
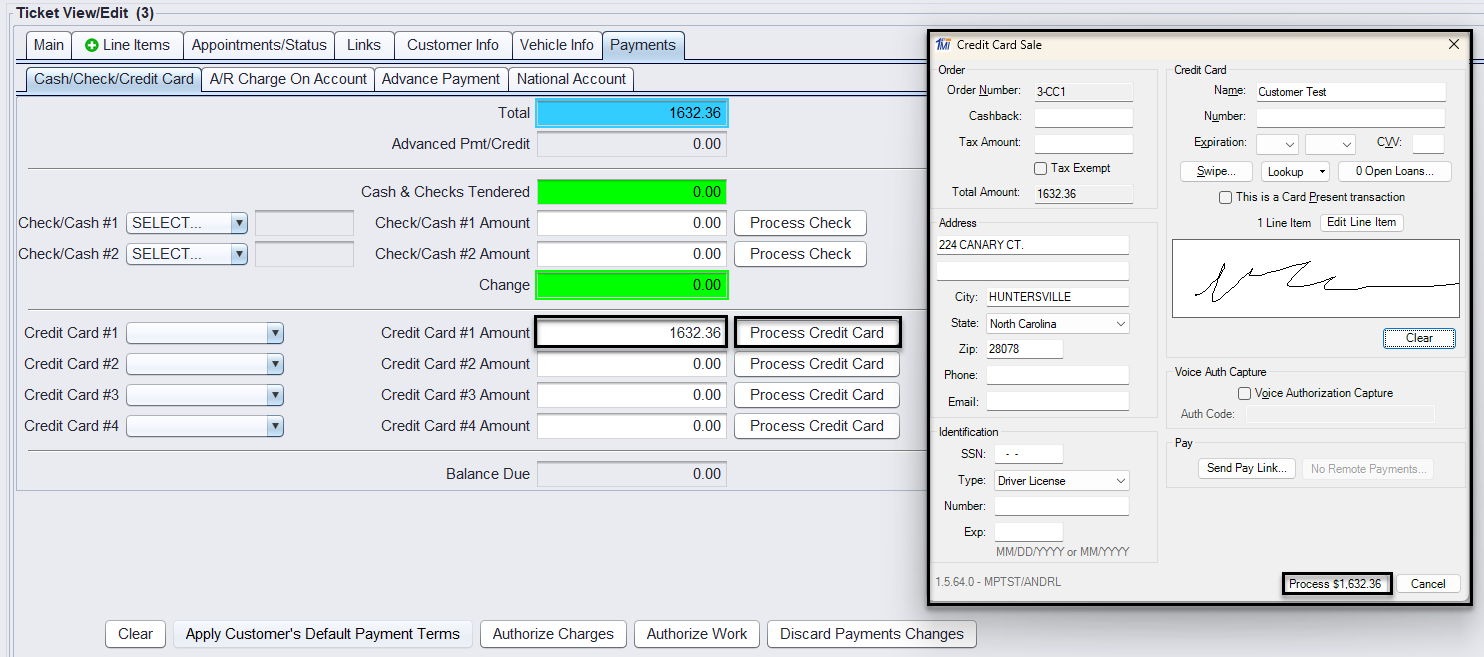
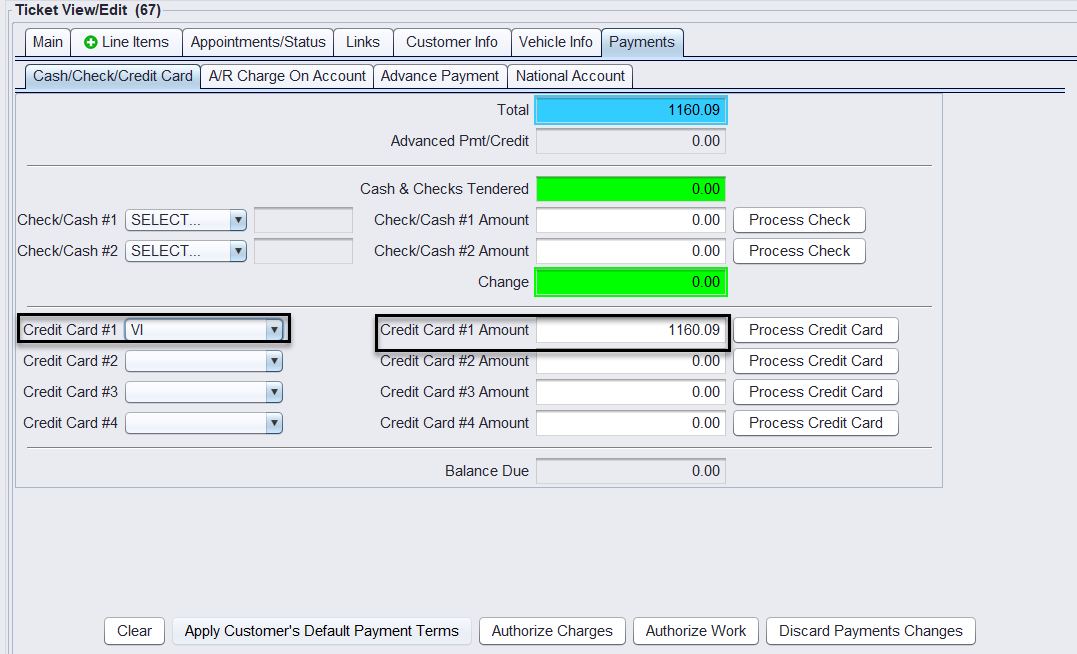
Non-Integrated Credit Card Payment
If your shop does not use Merchant Partner integration:
1.) Go to Payments > Cash/Check/Credit Card.
2.) Use the Credit Card #1 dropdown to select the card type (e.g., VI for Visa).
– Selecting the card type will automatically populate the Credit Card #1 Amount field with the full ticket total.
3.) Adjust the amount if needed (e.g., for a split payment).
4.) Swipe the card using your external terminal.
5.) When the Balance Due = 0, click Close.
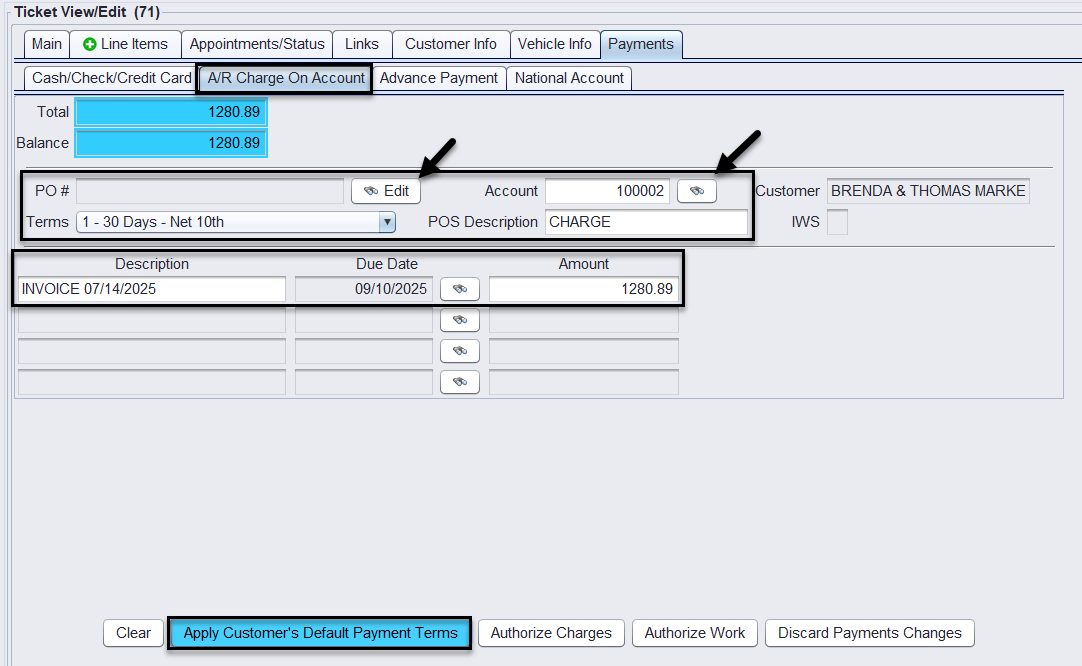
A/R Charge On Account (Open Items Customers)
For Open Items customers, use the A/R Charge On Account tab to apply terms rather than collecting payment upfront.
1.) From the Payments tab, select A/R Charge On Account.
2.) When working with an Open Items customer, selecting the A/R Charge On Account tab will display their current ticket balance and allow you to apply terms.
3.) Click Apply Customer’s Default Payment Terms.
4.) If needed:
-
-
-
- Click Edit on PO Number if the customer requires it for billing. This will take you to a PO Number entry field to populate.
- To bill a different Open Items account than what’s shown on the ticket, click the Account binoculars to search and select another eligible Open Items account.
-
-
5.) Confirm the Terms dropdown reflects the appropriate term (e.g., 30 Days Net 10th).
6.) If needed, update the Due Date manually after applying the terms.
7.) Proceed to Print and Close the ticket.
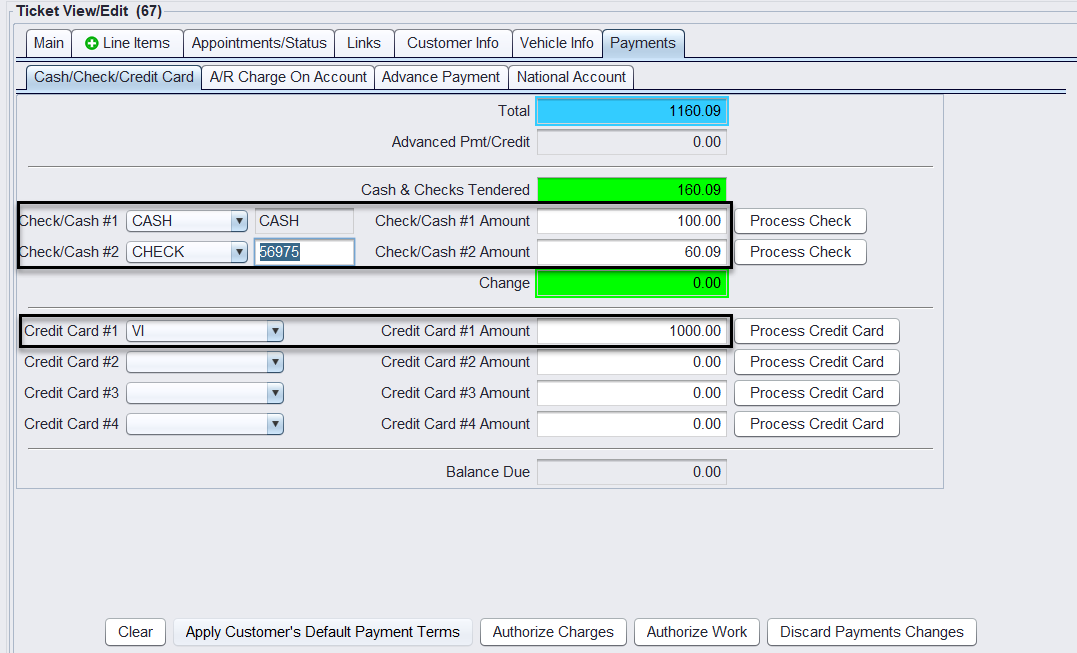
Split Payments
You can combine any of the following methods:
- Cash
- Check
- Credit Card (up to 4)
- A/R Charge
- Advance Payment
- National Account
Enter each portion in the appropriate field on the Cash/Check/Credit Card or A/R Charge On Account tab. You must ensure the Balance Due = 0 before you can close the ticket.
Advance Payment
To apply an advance payment or credit to a ticket, use the Advance Payment tab. This is used when the customer has previously deposited funds.
National Account
To bill a third-party National Account (e.g., Goodyear, Bridgestone), use the National Account tab.
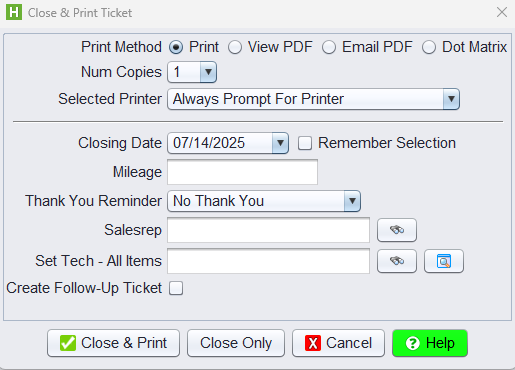
Finalizing the Ticket
Once all payments are entered:
1.) Ensure Balance Due = 0
2.) Click Close
3.) In the Close & Print Ticket screen:
-
-
-
- Select your Print Method (Print, View PDF, Email PDF, etc.)
- Enter Mileage (if applicable)
- Enter Sales Rep Code
- Choose Tech and other options as needed
- The Closing Date is required and will only allow selection from open store dates
-
-
4.) Click Close & Print or Close Only to finalize the ticket
If you have any issues processing a payment, you may click Clear to reset the fields and start again, but only before the transaction has been finalized. This option is unavailable once an integrated credit card payment has been processed, or the ticket has been saved or closed.