
How to add and manage products, labor, and service packages on a ticket in HITS. You can use the Line Items tab or the shortcut buttons on the Main tab to quickly build and update quotes or work orders.
Adding Items Using Shortcut Buttons (Main Tab)
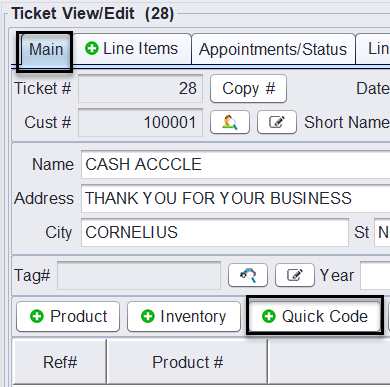
From the Main tab, you can use the green shortcut buttons to quickly add parts and services:
Shortcut functions:
-
- Product/Inventory: Search and add inventory items by part number
- Quick Code: Insert favorite (frequently used) items or services
- Service: Add a labor line
- Package: Add predefined service bundles (e.g., tire install + fees)
- TireCAT/LubeCAT/ServiceCAT: Open catalog search by category
- Specs/Comment: Add spec lookups or internal/customer-facing notes
These shortcuts will open the relevant item search window and drop the selected line directly into the Line Items tab of the ticket.

Using Quick Codes (Favorites)
Quick Codes are preset generic product numbers used for fast entry. These codes allow you to bill labor, outside purchases, or miscellaneous charges.
Quick Codes are best for items your shop uses constantly, such as:
-
- Common labor items (Alignment, Brake Inspect, Rotation)
- Shop supply charges
- State inspection fees
- Tire disposal/environmental fees
- Tire mount & balance labor
- Oil change labor items
- Diagnostic charges
- Road hazard packages
- Commonly sold small parts (wipers, bulbs, TPMS kits)
You can enter these codes from:
- The Main tab using the Quick Code shortcut button
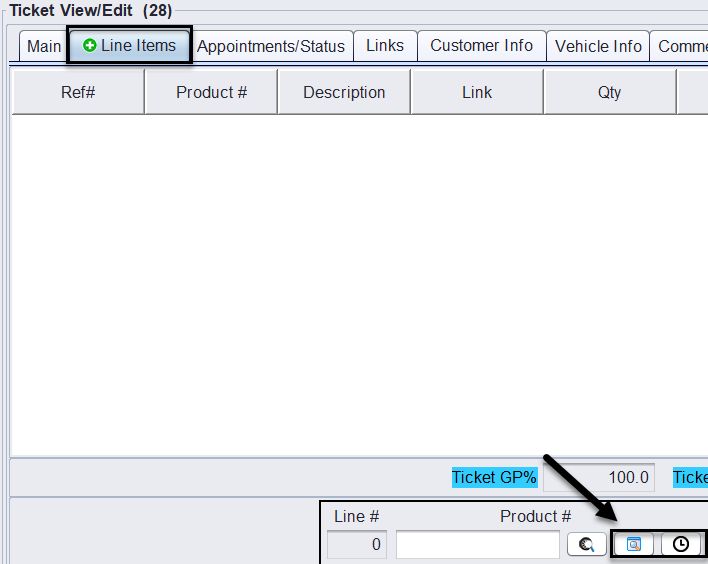
- OR directly in the Product # field on the Line Items tab

How to Mark an Item as a Quick Code
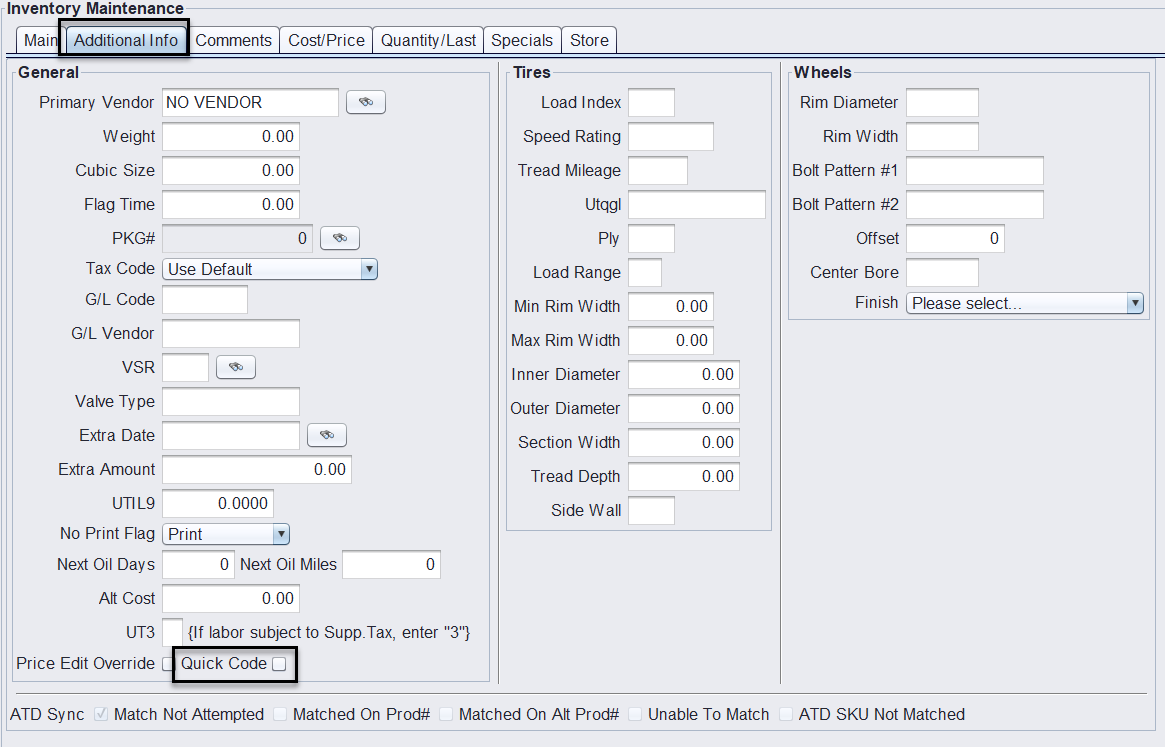
1.) Go to: Views>Administration & Utilities>Inventory Add/Edit/Delete and select the Additional Info tab.
2.) Search for the item you want to make a Quick Code (part, fee, labor item, shop supply, service charge, etc.)
3.) Click the Additional Info tab
4.) At the bottom of the screen, check the box labeled: Quick Code
5.) Click Save
Once saved, the item will now appear:
-
- In the Quick Code button list on the Main tab
- In the search window when users click Quick Code
Adding Items from the Line Items Tab
1.) Navigate to the Line Items tab on the ticket
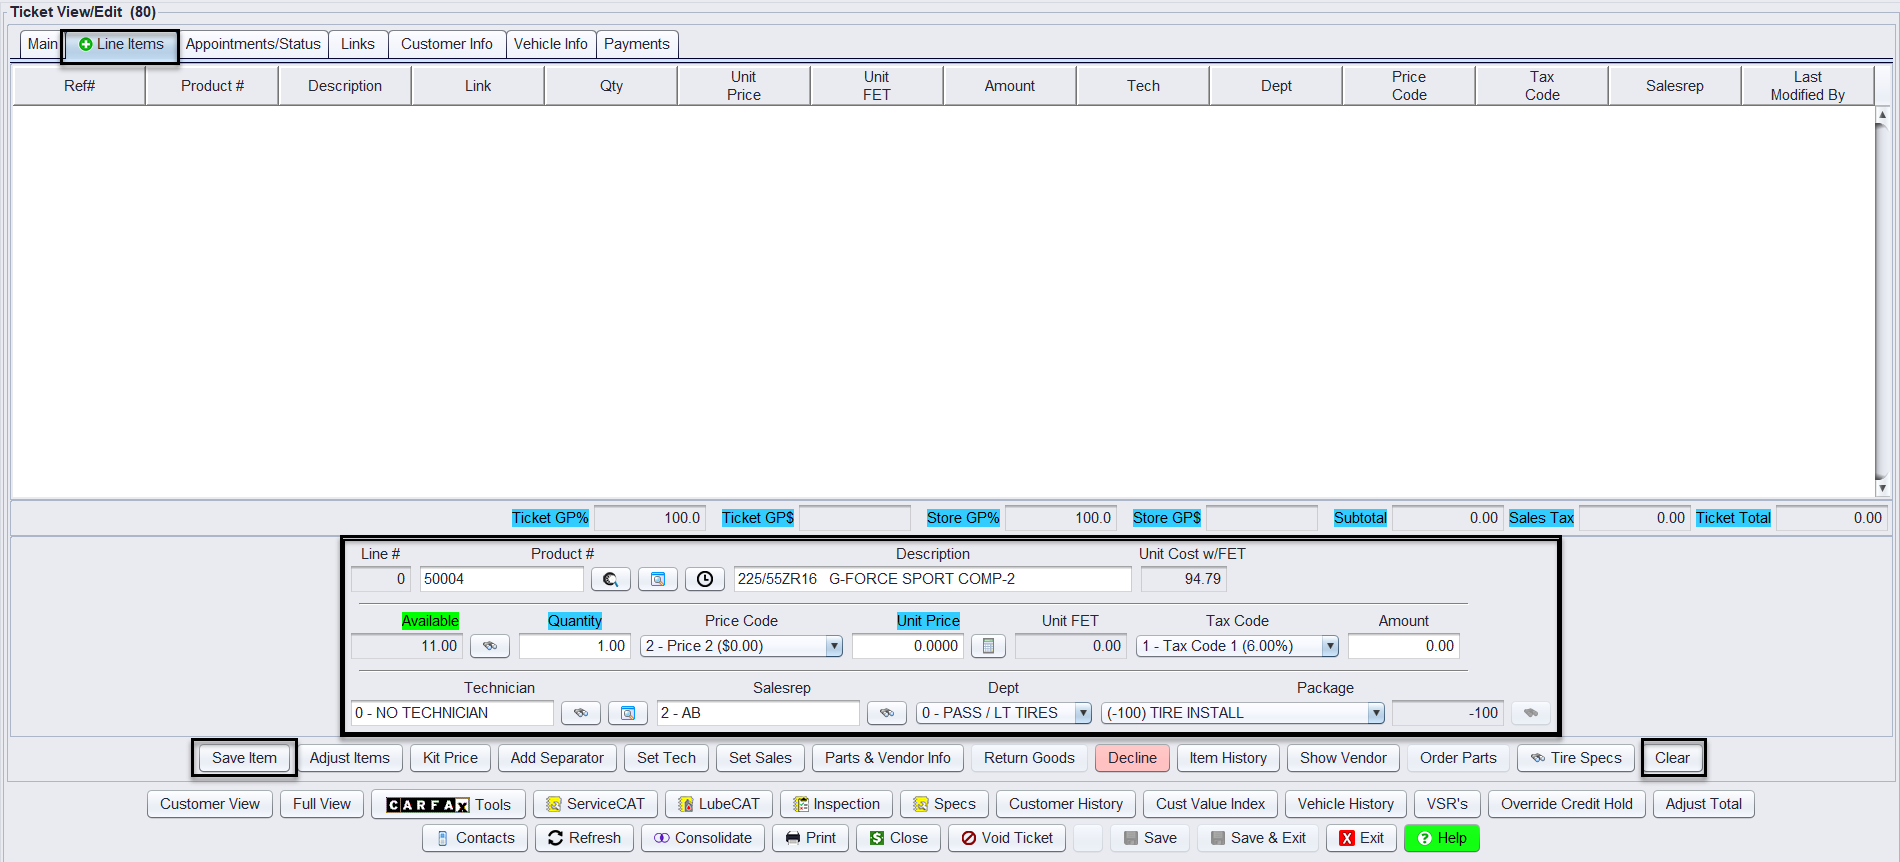
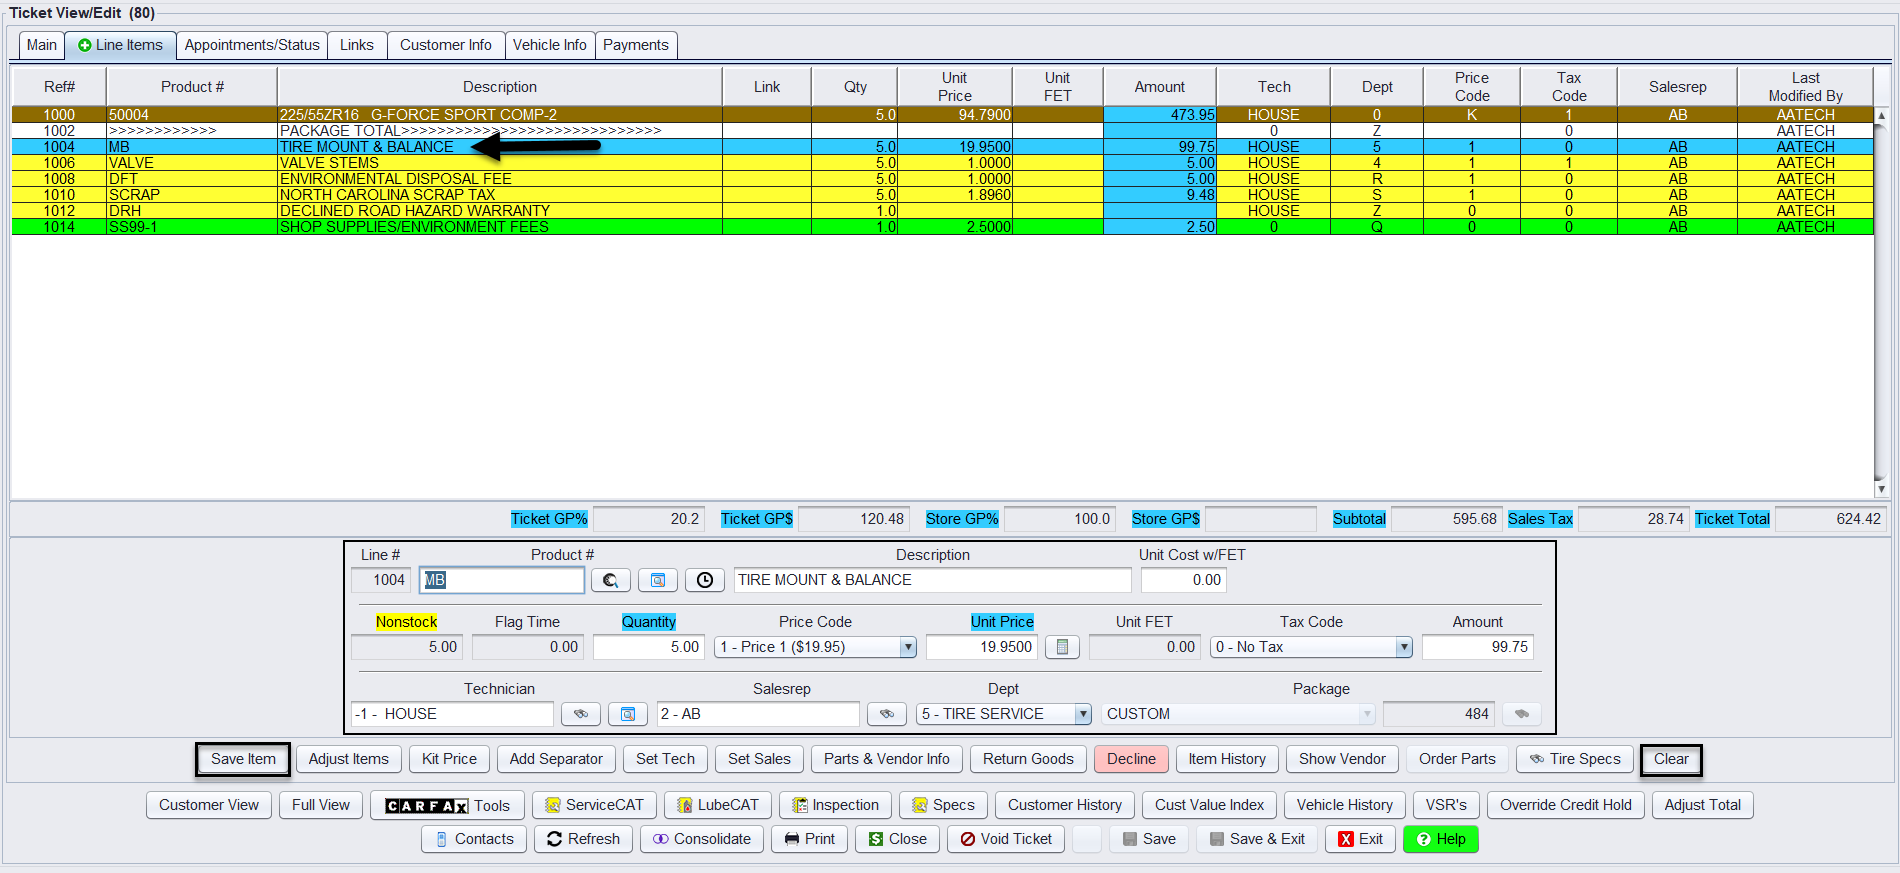
2.) Enter a Product # – type a part number, labor code, or Quick Code. Or click the Search icon  to look up items by part number, size, or description.
3.) Press Enter to confirm the selected product. Once selected, the system will auto-fill:
-
- Description
- Unit Cost w/FET
- Availability (stock quantity)
- Default/Customer pricing and tax code
Note: Fields that are grayed out (like Unit Cost or Description) are read-only. Editable fields will remain white and active depending on user permissions.
4.) Some fields will automatically populate based on the product or customer information. You only need to edit fields when overrides are required.
Fields you can (and may need to) adjust:
-
- Quantity – Update if the item involves more than one unit.
- Price Code – Use the dropdown to apply specific pricing tiers (if enabled).
- Unit Price – You may manually override the default if price code rules allow.
- Technician – Assign the appropriate technician completing the work.
- Sales Rep – Select the sales rep responsible for the item.
Fields you usually do not need to change:
-
- Tax Code – This is set automatically based on the customer’s assigned tax code.
- Dept – Automatically populated if the item is a stocked inventory item.
- Package – Automatically selected if the inventory item was assigned a predefined package.
Tip: If these auto-assigned fields are incorrect, review the customer’s account or inventory settings rather than editing them manually on each ticket.
Optional: Click the Clear button to reset the line item, if an incorrect part was accidentally added.
After Saving the Item
Once you click Save Item, the line will appear in the upper grid on the Line Items tab.
-
To edit a saved line item, double-click on the line in the ticket view/edit screen.
-
Make any necessary changes in the fields below, then click Save Item again to apply your changes.
Note: Line items can only be edited from the Line Items tab. They cannot be modified from the Main tab or other sections of the ticket.
Editing a Line Item on a Ticket
Once a product or service is added to the ticket, you can make changes to it from the Line Items tab. This guide covers how to open, edit, or delete line items using both double-click and right-click methods.
How to Edit a Line Item
There are two ways to open a line item for editing:
Option 1: Double-click the line
1.) Click on the Line Items tab.
2.) In the upper grid, double-click the row of the item you want to edit.
3.) The fields below the grid will populate with that item’s details.
4.) Make necessary edits and click Save Item
Option 2: Use the Right-Click Menu
1.) Right-click on the line item you wish to edit.
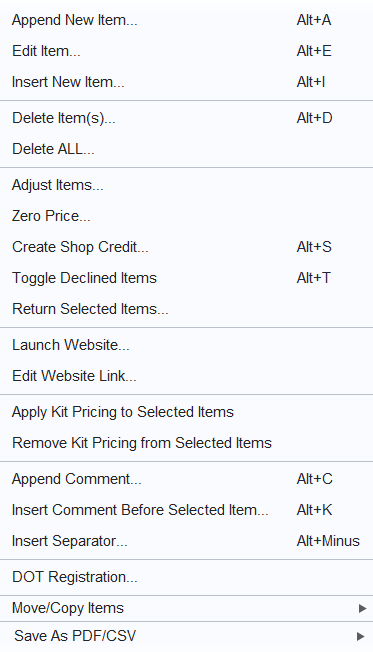
2.) Select Edit Item from the menu (or press Alt + E).
3.) The item will open in the editing fields below.
4.) Make necessary edits and click Save Item.

Editable Fields
Once opened, you may adjust:
-
- Quantity
- Price Code
- Unit Price
- Technician
- Sales Rep
- Package (if needed)
Note: Fields like Description, Unit Cost, and Tax Code are typically auto-filled and may be grayed out depending on user permissions or system settings.

Optional: Click the Clear button to reset the line item form before saving.
Other Line Item Actions (Right-Click Menu)
The right-click menu also allows you to:
-
Delete Item(s) – Remove the selected lines
-
Delete ALL – Remove all lines from the ticket
-
Adjust Items – Apply discounts or price overrides
-
Toggle Declined Items – Mark/unmark work as declined
-
Return Selected Items – Create a return line
-
Append Comments or Separators – For grouping or notes
-
Apply/Remove Kit Pricing – Adjust grouped labor/part pricing
These tools provide flexibility to manage ticket lines without restarting the ticket.
Quick Steps: From Building to Closing a Ticket
Click HERE to see the quick steps guide From Building to Closing a Ticket